Thursday, 27 March 2014

The real cost of the Olympics and World Cup

            Regular readers of this blog know that I often encourage people to exercise more and make such simple lifestyle changes as taking the stairs instead of a lift. The subject of today’s blog may therefore come as a surprise to some of you. Some of you may really disagree with my view here, but I only ask that you watch the video and think on the issues raised with an open mind.
            Recently London was the host to the Olympic Games. In the middle of a economic recession and two foreign wars we decide to spend thousands of millions on what are mainly some pretty mediocre spectator sports? All sorts of unlikely justifications were made for having the Olympics. It was claimed that it would stimulate the economy. Never has done in most countries that have hosted the Olympics. Britain is now downsizing its army, police services and medical services due to a budgetary deficit that is oddly very close to what was spent on the Olympics. The Olympics were going to improve public fitness by encouraging people to take up sports. Three solid weeks of spectator sports are going to encourage people to not sit on their sofas snacking? Many of those few who did feel inspired to take up sports probably injured themselves by overdoing it. So we won a few golds in some events? What changes has that made to our lives? Just we have to sit through a few lame advertisements featuring sports personalities. For the amount of money spent we could have saved money minting a gold medal for every single person in the British Isles.

            It was very interested to hear Brazil was hosting the World Cup and Olympics. Even more interesting was the suggestion that the favelas were to be knocked down to make way for the Olympic village. My Brazilian girlfriend’s response was one of amazement. “There will be a civil war! Last time they tried anything against the favelas they went into police stations and shot everyone!”

            This video, which I came across today, is worth a watch.


         If you have enjoyed this article or it has been helpful to you please feel free to show your appreciation. Thank you.
The Books

http://www.angelfire.com/art/enchanter/epsdbook.html
http://www.lulu.com/shop/http://www.lulu.com/shop/phil-west/survival-weapons-optimizing-your-arsenal/paperback/product-21488758.html
http://www.lulu.com/shop/phil-west/crash-combat/paperback/product-22603842.html
https://www.amazon.com/Anatopismo-Underrealm-Novella-Phil-West-ebook/dp/B077G7MMFM

Wednesday, 26 March 2014

Two Methods for Better Shooting.

             200th Blog Post!
            I must have been little more than a toddler when my father told me “you don’t pull a trigger, you squeeze it.” He had been trained this in the army and so deeply ingrained was this that he felt obliged to pass it on even though I was knee high and using a toy.

            Many years later I was visiting Los Angeles and my hosts took me to shooting range. My hostess was very proud of the fact that she had been on a firearms training course run by well know trainer and gun writer. In a passing I mentioned something about “squeezing the trigger” and got a blank look. She had been on this intensive and expensive course and yet the concept of not jerking a trigger was new to her.

            The other day I came across this article posted up on scribd. It is well worth a read and has some interesting ideas. It could have used an illustration of the recommended one handed grip, but you can probably work this out once you have mastered the two handed techniques. The idea of balancing things on you pistol while dry firing to check stability is kind of neat. I will also note that if you suspect your gun may not be suited to dry firing you can always chamber an empty casing or acquire some dummy/drill rounds.


            Another article I recently read suggested ways to improve your instinctive aiming. I don’t have a weblink for this one since it was rather old. The idea was quite simple.

            With an unloaded gun you close your eyes, aim at the target and then open your eyes. Correct your aim and then repeat the process again. The idea is to improve and educate your “muscle memory” to improve coordination of where you point and where you want to aim. The author suggests progressively making your target smaller as you improve. The latter echoes something I observed when I learn knife throwing. Throw at a man sized target and soon you are hitting a man sized target most of the time. Put a chest sized mark on the same target and soon most of your blades will stick in that area. Put a simple X on the target and most of you blades will hit within a few inches of here. It is all a question of focus. Often I would end up hitting knives I had already stuck.

            If your gun has a laser spot system this can be a useful training aid in using the above techniques. Toy guns such as Airsoft pistols can also be useful training aids.
         If you have enjoyed this article or it has been helpful to you please feel free to show your appreciation. Thank you.
The Books

http://www.angelfire.com/art/enchanter/epsdbook.html
http://www.lulu.com/shop/http://www.lulu.com/shop/phil-west/survival-weapons-optimizing-your-arsenal/paperback/product-21488758.html
http://www.lulu.com/shop/phil-west/crash-combat/paperback/product-22603842.html
https://www.amazon.com/Anatopismo-Underrealm-Novella-Phil-West-ebook/dp/B077G7MMFM

Monday, 24 March 2014

Shooting Over Trenches and Around Corners

 
            Given that it is Monday morning I will am going to avoid making this post too text intensive and just pass on some interesting images today. These are not really that useful for self-defence but they may interest or amuse, which is not a bad thing for a Monday morning.

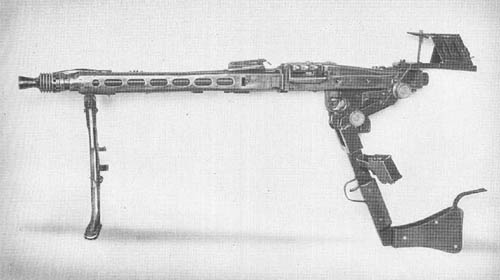
            Someone brought this image to my attention.


          What you are seeing is an attachment for an MG-42 that allows it to be aimed and fired from a trench or foxhole without the user exposing their heads. Similar devices date back to the First World War. Trench warfare was a predominant facet of this conflict and understandably a number of devices to facilitate firing from trenches were developed. Many of these devices adapted the standard service rifle, which often necessitated some mechanism to work the bolt action the chamber a new round. There were also periscope equipped Lewis guns.


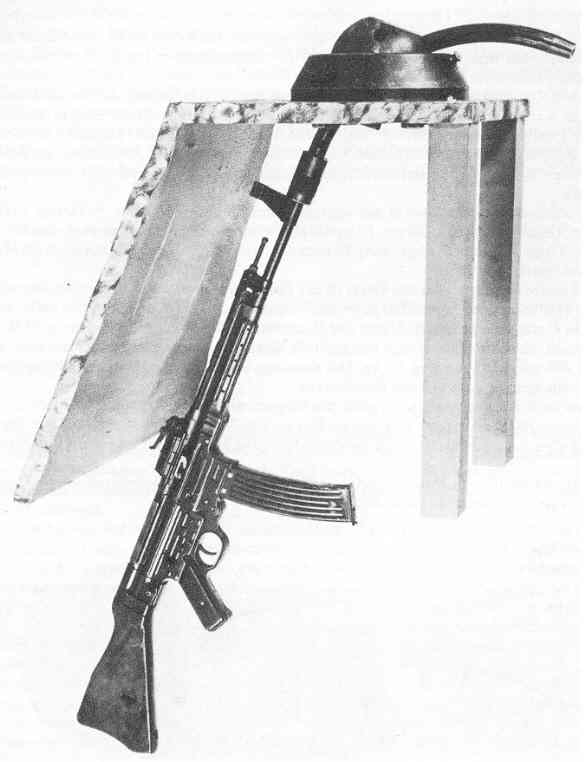
            During World War Two the Germans developed an alternate approach. The story goes that an institute that developed turrets for aircraft had a problem. The guns and their mountings had to fire a variety of directions including straight upwards, but bullets raining down from thousands of feet was a problem. A curved barrel fitting was created that would deflect the rounds into a mound of earth. The German army was concerned about the high number of head injuries that occurred while troops tried to fight from trenches. They also had a problem with Russian soldiers who would succeed in getting so close to Panzers that they could not be engaged with standard tank weapons. Someone saw the potential of a curved barrel fitting to solve both problems. The “Krummlauf” attachment was fitted to the StG44, a 30 degree model with a prismatic sight being used by infantry and a 90 degree model with a mirror being used by Panzer crews. 45 and 60 degree models are also known to have been made and the sighting system might vary depending on the vehicle it was used from.


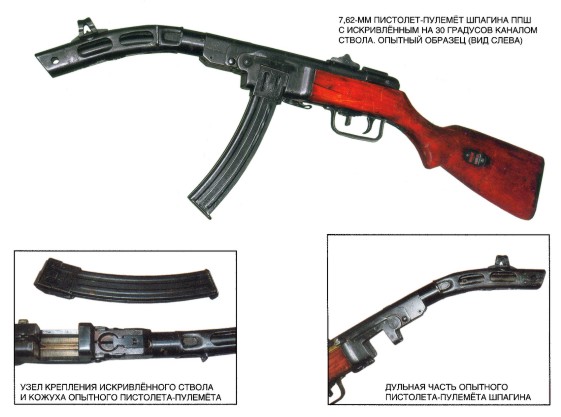
            After the war both the Americans and the Russians experimented with the Krummlauf for a number of weapons including the M3 and the PPSh-41. The fitting for the M3 is interesting in that part of the barrel is a gutter, open on its inner side. In recent years we have seen a new “gun that can shoot around corners”  for SWAT teams. This is the Cornershot, using a video camera system.
 

            I will leave you with another image, a rather ingenious way to blind fire utilizing the MP40’s folding stock.

         If you have enjoyed this article or it has been helpful to you please feel free to show your appreciation. Thank you.
The Books

http://www.angelfire.com/art/enchanter/epsdbook.html
http://www.lulu.com/shop/http://www.lulu.com/shop/phil-west/survival-weapons-optimizing-your-arsenal/paperback/product-21488758.html
http://www.lulu.com/shop/phil-west/crash-combat/paperback/product-22603842.html
https://www.amazon.com/Anatopismo-Underrealm-Novella-Phil-West-ebook/dp/B077G7MMFM

Saturday, 22 March 2014

Four Tricks for Cleaning Water.

            Today’s blog will be a short one, but it will cover a couple of useful and interrelated ideas, all to do with water.

            If you find a source of water, the chances are that it will not be too clean. All sorts of mud, dirt and grit may be floating in it and the organic components will affect the efficiency of chemical purification methods you may employ.

            One solution is to use a cloth bag to filter the water through. I have even seen it suggested to use a spare pair of trousers. Tuck one leg into the other to form a double layer and then tie a knot in end of the leg(s). Hang this up and pour water through so that it drips into a container. In a long term camp the filter can be packed with sand and straw etc. Note that the water produced will be clearer, but cannot be considered to be safe until it has been boiled or chemically treated.

            A variation of the above is the wick method. Fill a container with your crude, suspect water and place and empty container lower down. Connect the two with a strip of cloth such as a bandanna and allow capillary action to do its thing. This may work with other materials such as paper or string. Experiment. This method is a lot more economical on materials. When your wick becomes too dirty wash it or discard it. Note that while the water produced will appear clearer it cannot be considered to be safe until it has been boiled or chemically treated.


            A third method I was taught to call an indian well. We have all seen the movies when the protagonists get to a water hole and it is all muddy. “Oh no!” they cry. What they should do is start digging a hole near the shore of the waterhole or river. If the ground is too hard for your hands find an object you can use as a digging stick. A tent peg, tire iron, even a stick! The hole should be about half a metre across and deep. Since you have dug down into damp ground the hole will begin to fill with water. Poke a few holes in the side of the hole and it will fill even quicker. The water will probably look muddy and still something you do not want to drink. Using your hands, a bark scoop, tin can or anything else you have handy bail out the water and cast it onto the ground nearby. Eventually the water coming through should become clearer. Leave it a while and more material will settle out. The water will still need to be filtered further and boiled or treated. This is not the fastest method of getting cleaner water but does have the advantage that you can use it when not near an obvious water source. Just dig down into damp ground. Obviously, digging at a low point will be more productive than a hilltop.

            Our fourth method is useful for sunnier locations such as the desert, but may work elsewhere. Take two bottles, glass or plastic. Clear is good but if both are opaque use the darker coloured one for the “crude” water. Partially fill one bottle with untreated water and tape the necks of the two bottles together. Since we are in the desert we will assume you have a vehicle nearby (working or not) and it has some tape in the tool kit. (don’t go to places like the desert without a tool kit and other essentials in your vehicle!). If you have a suitable tube use this to connect the two bottles rather than taping them neck to neck. Find a slope or pile of sand, Select the side that will get the most exposure to the sun (the south in the northern hemisphere). If the bottles were taped directly together lay the two bottles on their sides and bury the empty one in the side of the slope, leaving the one with water exposed to the sun. Let nature take its course. The water in the outside bottle will be heated and evaporate. Being in a closed system it will pass into the interior of the buried bottle and the drop in temperature will cause it to condense. After a while the buried bottle will contain drinkable water which can be collected if you take the apparatus to pieces carefully. If you had a suitable tube you could have run this into the collection bottle when you constructed the device. If you paid attention in school you will recognise this method as distillation without the need for bunsens and heatproof glassware. The source water you used could have been urine and the produced water would still be safe to drink.


         If you have enjoyed this article or it has been helpful to you please feel free to show your appreciation. Thank you.
The Books

http://www.angelfire.com/art/enchanter/epsdbook.html
http://www.lulu.com/shop/http://www.lulu.com/shop/phil-west/survival-weapons-optimizing-your-arsenal/paperback/product-21488758.html
http://www.lulu.com/shop/phil-west/crash-combat/paperback/product-22603842.html
https://www.amazon.com/Anatopismo-Underrealm-Novella-Phil-West-ebook/dp/B077G7MMFM