Tuesday, 20 January 2015

Bag Thief Tricks to Watch Out For.


            I got reminded of the following incident in the past the other day when a friend of mine described how a friend of his had recently got a phone call claiming to be from the Police. She phoned the Police station that had been named and established that the call was fraudulent.

            Many years ago I was enjoying a quiet respite at work when there was a knock at the door. A young girl wanted to know where the security desk in the building was. While this building had security guards there was nothing that could really be described as a security desk.

            The young lady explains she had just got a call from her father. Her father had been phoned by her bank to tell her that the bank card she had lost that day had been found and that she could pick it up from the security desk the following morning. I thought about this for a couple of seconds and said “You need to cancel that card now! Use my phone!”

            What was happening was that the person who had stolen her purse had looked through her address book and then phoned her father pretending to be the bank. Being without your bank card for a couple of days while a new one is sent to you can be an inconvenience. Many people, if told that their card was in fact safe and could be picked up the next morning will not bother to cancel the card. This buys the thief an entire night to use your card. You can spend a lot of money in a single night in a big city!

            I think I have mentioned before that I regularly come across bags and other valuables just sitting in the corridors or place on top of lockers. Yesterday as I went for lunch I came across a bag just placed on a chair at the top of the stairs, no one else within sight. I handed it into security. Sometimes I hear the excuse “There isn’t much worth anything in it”. That is not going to prevent a thief from stealing it. You will probably find that many things you had in the bag were much harder to replace than you thought. Modern thieves have many new ways to milk a victim of money. Long term readers of the blog will know my girlfriend had a bag stolen a couple of years back. Using the information on her phone he got into her email account and stole the video game credits she was sending to her son for Christmas, credits that she had worked long and hard to earn the money for.

            Message for today is to be aware of tricks such as the one described above and not to give thieving scum easy scores.
 
 The Books
http://www.angelfire.com/art/enchanter/epsdbook.html


Monday, 19 January 2015

Single Whip and Horse Foot Palm.

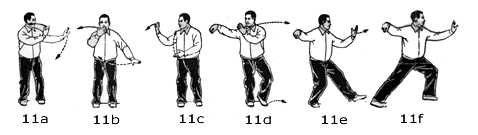
            One of the advantages of writing this blog is that I can often cover topics that there was not room for in either of my books. Today I am going to write a little about the “hooked fist” which in turn leads to some discussion of Tai Chi’s Single Whip movement.


            Single Whip has a number of variations and this is worth bearing in mind when you view videos of the movement. Some are variations between different styles of Tai Chi while others are different interpretations. While Tai Chi is a potent martial art many of its practitioners only study it for health or meditative purposes and this should be kept in mind when viewing movements.

            For purposes of today’s discussion the “whip” part of the movement will be considered to be with the right hand and the movement has three components I will discuss.


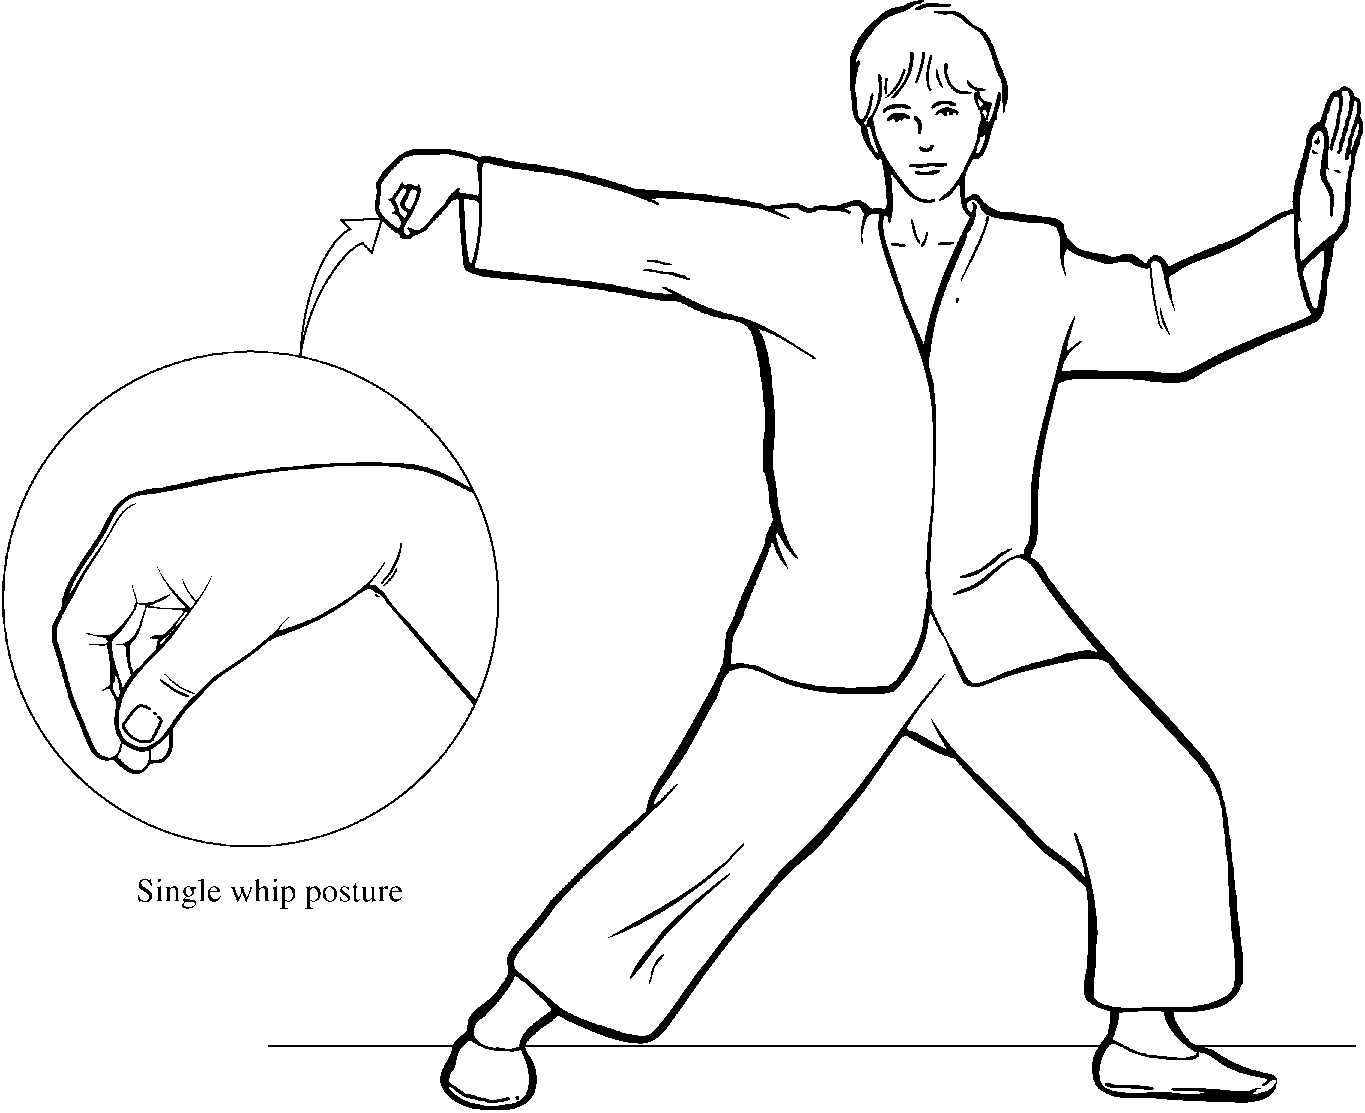
            The first “component” is the right hand which comes up to chest level and moves outward, the wrist bending so that the closed hand hangs down. The arm looks a little like you are whipping the rump of a donkey with a riding crop or switch, hence the name of the position. The shape the hand makes has a number of names. It is sometimes called “Hooked Palm” while the name “Turtle Head” is probably the most descriptive. Some instructors liken it to the “Crane Beak” hand form. Given the equestrian aspect of the Single Whip position the “Horse Foot Palm” name is perhaps most apt.

            After the right hand has assumed position the body turns to the left and the left hand comes up in an open palm. On some variants this is a simple semi-circular movement while other variants cause the hand to roll over or spiral.

            At the same time that the left hand moves the left foot steps forward and outward slightly. I used to find the turn and step unusually difficult until Erle Montaigue told me you should keep your left elbow above your left knee when making that part.

            In English we tend to call Single Whip a posture or position but it is actually a sequence of movements. When movements from a Kata or Form are used in combat it is unlikely the whole thing would be used and exactly as you would perform it during a Kata. Elements of a Kata or Form are rather like clay from which you build the thing you need at the moment that you need it. They are not rigid geometric or mathematical constructions, or at least, they are not once your use of them matures. Most Tai Chi moves are multifunctional. One instructor may tell you the combat application is one thing, another that it is something else. In reality there may be many more applications. With that in mind, let us investigate some of the combat applications of the components of Single Whip.

            Single Whip is very much the signature move of Tai Chi. In movies such as the Matrix you will see Single Whip used as an opening posture. In reality it is better reserved until range has been closed with an opponent.

            The left palm’s most obvious application is that it is a palm strike. It is in a good position to hit the chest region or the chin and the accompanying step forward adds power. The open palm can also be used to parry, either with the palm or either edge of the hand. The spiralling motions used for the left hand in some varieties of Single Whip can be used to neutralize a wrist grab.

            The Horse Foot palm is probably most widely understood as a parrying hand form. It can hook over an enemy’s arm and pull it out or down. It can parry to either side or upwards. In his book “Knives, Knife Fighting and Related Hassles: How to Survive a Real Knife Fight” Marc MacYoung describes a Tai Chi inspired “Whip Parry” as a defence against knife attack. Since the arm is semi-relaxed the parry has a very short response time. Marc recommends that you move the wrist and let the hand go along.

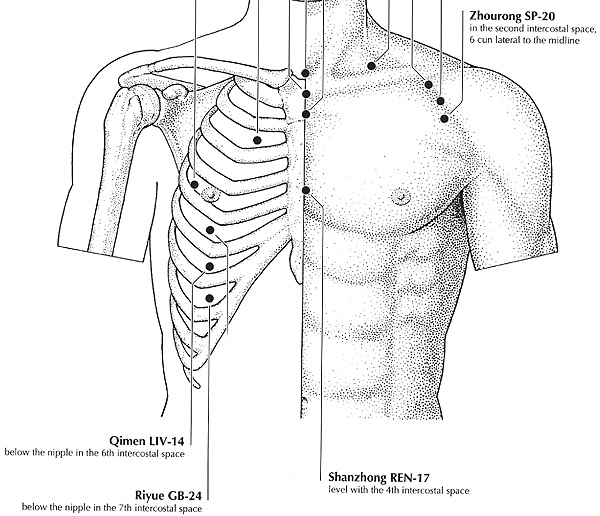
            Horse Foot palm can also be used offensively in a number of ways. The most obvious is to use it as a hammer-fist strike against targets such as under the arm or the temple. The hand can also be used as a reverse hammer-fist, swing inward to hit targets such as the back of the head or the shoulder blade. The hand can also be used to execute a downward glancing punch against certain bony areas of the body. The hand posture is such that the force of hitting a bony area is dissipated along the arm. Targets often used for such attacks include the GB 22 point about 3” under the armpit and the area just below the pectoral muscle. The latter are Liv 14 and GB 24, on the mammary/mid-clavicle line, a couple of ribs down from the muscle in the sixth and seventh intercostal spaces. These are all potent and potentially very harmful targets which can also be attacked by a hammer-fist from a Horse Foot Palm. Horse Foot Palm can also suddenly be flipped over to make a back-fist strike to the enemy’s nose!


            Both hands can of course be used together. Either hand can parry while the other counter-attacks. If one hand grabs the wrist the other can contact the elbow in various ways and apply various varieties of lock. This is another possible application for the spiralling movement of the left hand. Armlocks can be used to unbalance a foe.

            The step forward with the left foot also has martial applications. In high level Tai Chi it is supposed to strike the KD 5 point on the enemy’s foot and drain their Qi. For the less advanced of us it can be positioned to stop an enemy stepping back to regain their balance when the balance is disrupted by hand techniques.
         If you have enjoyed this article or it has been helpful to you please feel free to show your appreciation. Thank you.
The Books

http://www.angelfire.com/art/enchanter/epsdbook.html
http://www.lulu.com/shop/http://www.lulu.com/shop/phil-west/survival-weapons-optimizing-your-arsenal/paperback/product-21488758.html
http://www.lulu.com/shop/phil-west/crash-combat/paperback/product-22603842.html
https://www.amazon.com/Anatopismo-Underrealm-Novella-Phil-West-ebook/dp/B077G7MMFM

Friday, 16 January 2015

Survival Fishing. Part One.

A friend of mine requested that the blog has something about survival fishing. The section below is adapted from a book chapter by myself that was never published.

Many survival guides will explain how to catch fish in greater detail that I have room for in today’s blog. They usually include ways of fishing without using a line such as trapping, lassoing, tickling, spearing etc. Some of these techniques are described in my book on Survival Weapons.
Today’s blog will manly cover the selection of items for an emergency fishing kit but we will include some information on their use, since many people find the depth of knowledge given in fishing books confusing. Also most such books are written from a sporting perspective - when the alternative is going hungry your methods may not be so elegant. This blog is about survival fishing for food. Using some of these techniques when your survival does not depend on them may result in prosecution. 

Where to look for fish:

1. Weirs ( a good place all year round)

2, Edge of reed beds

3. Eddies in streams and rivers or known deep pools

4. Overhangs of trees (Watch your line!)

These are usually the places fish congregate most but use your eyes and look for them. Some cunning may be required and creeping up to the water's edge may be necessary to see and catch fish. Keep low so as not to skyline yourself.

The Minimal Fishing Kit.
·At least 10 m of line (10 to 15lbs), possibly wrapped around a half of matchstick or held in a coil by a rubber band or wire tie.

·Pack of hook to nylon size 12. Depending on how these are carried, the points may need to be taped over.

·Small assortment of split shot (BB are probably the most useful size).

 This minimal kit will all pack into a 35 mm photographic container or similar and the outside of the tube can have a length of brightly coloured tape wrapped around it. There will probably also be room for a spinner, wire leader, swivels and a small cork to act as a float (about ½ x ¼ x ¼” drilled with a 2mm hole).

The kit in my personal emergency kit also includes:
·A coil of braided fishing line, turquoise in colour, carried in a loose coil. The rings of the swivels carried should be large enough for the braided line to pass through. Likewise the rings of the loose hooks and lures are of sufficient size they can be fitted onto the snap links. 

·A small tube filled with BB split shot. 

·About 10 metres of 6lb test monofilament line, wrapped around the tube of shot and secured with a piece of tape. In retrospect I'd have the monofilament in a looser coil. 

·Five wire traces, about 18-24” with a swivel at one end and a snap swivel at the other. Wire traces can be brought though mine were made from brass picture hanging wire, unbraided into four or three strand pieces. These can be used as snares but do not look as suspicious as custom-made snares. 

·Various hooks, most of them small (size 12), attached to monofilament with a swivel at the other end.

·Loose hooks. 

The hooks and hooks on nylon fit in the little plastic wallets the hooks came in and these fit in a plastic bag with the wire traces as well. The knots attaching the hooks and swivels to the line are varnished over for added security. When you are cold, wet and hungry is no time to be trying to tie fishing knots. I prefer to sit in the warm comfort of my home and attach as many hooks as possible to a short length of line, tying a loop in the other end that can easily be slipped through a loop tied at the end of a longer line. For some useful fishing knots see my free on-line book on knots.
 
A Mepp-type lure (above) with a little silver spoon that spins around and attracts fish is also in the kit. It also has a piece of red rubber covering the shank (most fish and sea birds have their vision biased towards the red end of the spectrum). White or Red “Mackerel feathers” would make good additional lures, as do hooks with sections of tin can or tin foil added. A piece of white plastic cup will also make a good lure. 

Fishing Methods.
Passive fishing is to set up a rig and leave it unattended although there's no reason why you can't sit and watch it if you like. The most common way to do this is to set up what is termed a “Nightline”. As the name suggests, this can be left overnight and any catch collected in the morning, which is useful if you spend the daylight travelling to safety. There's no reason why you can't rig up a nightline during the day, of course. It's a good idea to check the line several times during the night, since some beasts such as frogs and turtles can break free if left long enough.
Attach one end of the line to the bank and the other to a weight, and attach leaders with baited hooks at intervals along the line. Throw the weighted end into the water. This is easier if you use a forked stick since it prevents getting caught by your own hooks. Drive a stick with a notched top between the water and the anchor point on the bank and run the line over the top. Movement of this stick will show something is hooked. Placing a pebble or chunk of mud on top of the stick provides further visual clues: if it has dropped off, you've caught something!
Alternately run the line over the water between two points, like a washing line with the baits suspended at different depths. An improvised bell (empty tin can) can be used to signal a catch. Vary the baits and take note of which ones seem to be taken most often. You can also hang lines from branches overhanging the water. 

Active Fishing.
Active fishing involves you holding onto the line and sometimes actively moving the bait or lure. Such fishing prevents you from doing anything else, so is best considered if you have to remain in the same location, such as near a crash or a broken down vehicle, or are with a companion who can't travel.
Active Fishing and other methods will be described in following blogs.

If you have enjoyed this article or it has been helpful to you please feel free to show your appreciation. Thank you.
The Books

http://www.angelfire.com/art/enchanter/epsdbook.html
http://www.lulu.com/shop/http://www.lulu.com/shop/phil-west/survival-weapons-optimizing-your-arsenal/paperback/product-21488758.html
http://www.lulu.com/shop/phil-west/crash-combat/paperback/product-22603842.html
https://www.amazon.com/Anatopismo-Underrealm-Novella-Phil-West-ebook/dp/B077G7MMFM
https://www.amazon.com/Hell-Ay-non-partisan-sourcebook-role-play-system-ebook/dp/B07FQSHSQC

Wednesday, 14 January 2015

Sandbags. Alternate Uses.

            Recently I have been reading about certain aspects of World War One, in particular the Stosstruppen or “Stormtroops”.
            A common and distinctive element of the Stosstruppen equipment is the grenade bags underneath the arms. These were often sewn from sandbags. Sandbags had other uses too. One illustration I saw had a soldier carrying a sandbag to collect any booty or intelligence material he came across in a raid. Another feature of the Stosstruppen was that they did not bother to carry their backpacks into battle. Backpacks were for the march to a position and were usually placed in storage once there. Instead the Stosstruppen created an “assault pack” by rolling their greatcoat in their shelter cloth and strapping it as a horseshoe shape around their mess tin.
 
            If attempting to capture a position a unit was required to carry four days’ worth of rations. Units in newly captured locations could easily become isolated. The rations of a German soldier a century ago were somewhat more spartan and modest than those of modern soldiers but I suspect he would still be hard pressed to carry four days’ worth in just an assault pack and the “bread bag” on his belt. A feature of trench fighting was that it was often only the lead elements that would be doing any actual fighting. The point would be taken by a couple of rifle, pistol or SMG men and close behind a “bomber” would toss grenades into the next trench section. Most of the unit would be carrying entrenching tools, sandbags and any other items needed to consolidate a captured trench section. These bearers would doubtless have also carried the bulk of the unit’s four day ration. This still raises the question as to how to carry those rations without backpacks. What I suspect is that often the rations were carried in the unfilled sandbags the unit was required to take along.
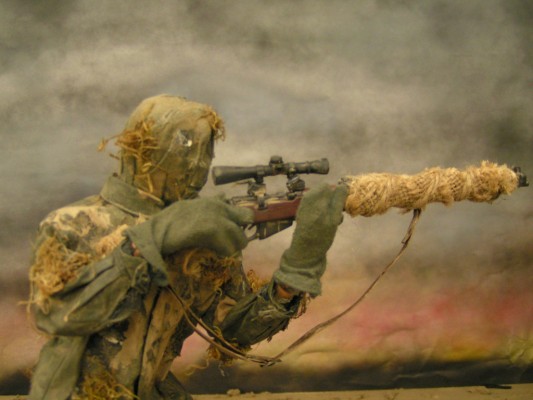
            Sandbags had many other uses too. A sandbag could be wrapped around a rifle barrel to camouflage it when sniping. Camouflaged face veils for snipers could also be made from sandbags. Sandbags were used to make helmet covers, making your head less of a target when moving behind sandbagged parapets. Frayed bits of sandbag could be sewn to a garment to break up the shape and provide additional camouflage.

 
            When it comes to using a sandbag as a carrying sack it is informative to look at the Russian veshmeshok. The neck is twisted closed and the carrying strap used to form a sort of lark-tail knot. A typical sandbags is 14-15” x 26-32” and can hold about 30-35lbs of dirt so a carrying bag made from one can hold a useful load. Holes punched in the bottom corners, possibly eyeleted can be used to take a cord and made adjustable with a simple bowline knot. Alternately a small object such as a stone can be placed in the lower corners and a constrictor knot or round turn and half hitches can be tied around the material behind the object. The latter technique, incidentally is useful when you need to use a shelter sheet that does not have eyelets. There is not frame in a veshmeshok or sandbag, of course, so you have to give some thought to what you put in and in what order. Make sure there is something soft against your back!
In my book I mention that claymore mine bags often were used as handy ammunition carriers. A sandbag could provide the basic material for a similar but lighter carrier with just some basic sewing. Sew up the mouth and open one side, divide the compartment in two and add a strap, flap etc.
 
            To both the World War One and modern soldier sandbags are readily available and worth utilising. If you are a civilian then sandbags can be purchased from builder suppliers and garden stores and can often be found for less than a dollar each. Modern types are of circular woven polypropylene but more traditional hessian is also still available. A synthetic may be better for a carrying bag while hessian is better for adding camouflage to a hunting outfit. Hessian is quite a useful camouflage colour, particularly if used with contrasting browns, greens or greys. If you are wrapping a rifle stock in hessian remember folds, creases and shadows help break up the shape. You can also apply some paint of dye in dabs of a contrasting colour but don’t go overboard. It is the contrast and irregular intervals that help break up the shape.
         If you have enjoyed this article or it has been helpful to you please feel free to show your appreciation. Thank you.
The Books

http://www.angelfire.com/art/enchanter/epsdbook.html
http://www.lulu.com/shop/http://www.lulu.com/shop/phil-west/survival-weapons-optimizing-your-arsenal/paperback/product-21488758.html
http://www.lulu.com/shop/phil-west/crash-combat/paperback/product-22603842.html
https://www.amazon.com/Anatopismo-Underrealm-Novella-Phil-West-ebook/dp/B077G7MMFM