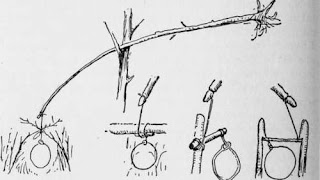
Today I will start with a warning. Knowing how to trap for food is an important component of your knowledge. It should, however, only be used when needed. I do not condone poaching, nor leaving traps set for any other reason than genuine survival needs. Practice building them if you want, but break them up once you are done. If you use this for poaching or unnecessary cruelty you deserve everything that may happen to you.
In my first book I used the principle of teaching by which I concentrated on underlying common principles. For example, rather than trying to teach dozens of different Judo throws I taught the principles of balance and obstruction around which most are based. A similar idea is used in my knot book. You are taught a knot, then introduced to similar knots that have different applications. From the clove hitch it is easy to learn the constrictor, transon, slippery hitch and buntline hitch, among others.
Recently I came across a similar approach to learning trap construction. Rather than try to memorize every design in the survival manuals, learn a single mechanism that could be put to many different purposes. Look for the similarities and common features as well as the differences.
This is the basic mechanism, which is pretty easy to understand. Don’t make the trigger parts from green wood or that which is gummy. You do not want these parts to stick together. The following examples will also give you a good grounding in understanding other types of traps.
Power to the trap can be either by tension or by counterweight. Counterweights are often shown as tree trunks or rocks, but can be a limb used as a lever under its own weight. The constant load may uproot stakes or cause parts of a mechanism to fail, so inspect traps when you check them, even if they have not caught anything. As can be seen with the fish trap, there are applications for this mechanism other than snares. A mechanism that can hold up a weight can also be used to drop it! A crash site or battlefield will have lots of metal and plastic that can be used for trap construction. This option is not shown in most survival manuals. The piece of parachute harness shown should also suggest to you that the hook in most of these diagrams could easily be a ring or loop instead. Use a stone or similar to smooth and taper a peg used for a loop or ring. A toggle on the end of a line can be used to pull a ring from a peg.
The form of the next trigger looks different but the principle is exactly the same. Rather than a hook (or ring) you have a toggle and two pegs/pins. In this particular example the counterweight also acts as a deadfall. The toggle is held by two pegs. These pegs could be spent cartridge cases hammered into the bark. If using nails bend them upwards slightly so the toggle does not catch on the heads. Always test trap mechanisms.
The next illustrations show the same principle again, but a slightly different form. Effectively a notch or hook and a crosspiece. Note that a single trigger can serve several nooses.
These variants are the same as the last, but support the horizontal with two supports rather than one. The first illustration is not a spring snare, but could easily be improved to be one. The stick shown will not slow the rabbit down much, but might hinder it entering its burrow. This may be a considerable distance away, so making a better trap or using a larger/ additional drag would be more humane and better for the survivor too. Do not underestimate how much weight a trapped animal will drag. Secure traps to heavy weights or well-rooted objects in preference to simple stakes.
A horizontal such as this could support multiple snares. Note how one example has the supports orientated so the trap works in either direction. In another illustration the contact areas have been reduced to make the trap more sensitive.
Here is another variation of the basic mechanism. Some might argue it is a different mechanism, but I like to think of it as a toggle tied off-centre. Note how it can be worked with a platform or tripwire, and that it can be used to raise nets or drop weights as well as snares.
A variation of the above systems. The cord is hitched around the support pole and disturbing the trap releases it. Test to ensure it works smoothly.
This variation holds the toggle between two other parts. This has a passing resemblance to the “Figure-Four” type mechanisms. A small saw, such as that on a Swiss army knife, may be very useful in making these fitted mechanisms.
A variation of the mechanism using two pegs in a tree-trunk. Here a nail is used in place of the toggle bar.
This is a commercially made trap, I believe, but illustrates how scrap metal and other “non-woodland” resources can be used. The trigger is simply a hole that fits over a pin. Weight in the platform levers it off the pin.
Some more variations of the systems shown. Note, trap is positioned so that the only way to the bait is through the noose.
If you have enjoyed this article or it has been helpful to you please feel free to show your appreciation. Thank you.


