Two projects I completed some time ago but had not got around to photographing.
The first project was to experiment with some textilage on rucksacs. For this I used a British army “Northern Ireland” patrol pack and a larger rucksac. I found a company that sells half a kilo of camouflage material strips. Most are PU MTP pattern and unlike most MTP there is good contrast between the colour elements. Strips of hessian cloth or cord are also used. Note the variation in DPM colours. This is particularly notable between the large pack and its side pouches.
This is the large pack. Note that the side pouches can be removed. More on this later.
Harness side. The shoulder straps have a strap sewn down them in loops. These allow strips of fabric to be easily applied.
“Public” side of the large pack. Some netting, brown on one side and green on the other, has been added to the lid. This does not show up much against the DPM, but can be used for attaching natural materials. Note that there are are additional “ladder” straps down the outside. More textilage could be attached to these to further break up the shape.
Patrol pack, harness side. The shoulder straps lacked a looped narrower strap. Instead a length of paracord was zig-zagged down the padding and sewn at the curves. As you can see, the paracord is totally hidden by the textilage and the shoulder straps themselves are well concealed.
Public side of the patrol pack. Textilage added to the pack top to break up the shape. The top photo is the standard configuration. The side pockets are well constructed with a waterproof lining and drawcord top, the latter in DPM PU. Unlike the side pockets of the larger pack, these cannot be be detached. This feature may have been added to later versions of the Northern Ireland.
This photo (above) shows my second project. This pack has been modified so that a pair of the detachable side pouches can be attached. This can simply be achieved with some lengths of 20mm webbing and 20mm buckles.
Side pouches rigged for independent use.
Side pouches with their harness. The entire thing can be clipped to the patrol pack without needing to be disassembled.
In my recently published book I discussed how increasing gun control legislation is likely to create a market for firearms produced by organized crime. Today I came across this interesting blog on improvised and homemade firearms across the world. Notable is that while some examples are quite crude, some are very sophisticated and seem effective for their purpose. Many of these guns are produced in countries with very restrictive gun laws such as Australia, China and Northern Ireland. This photo shows an SMG factory that was in business for 20 years in Northern Ireland.
This weapon was produced in Denmark right under the noses of the Nazis.
A recent blog post was an illustration of how easily firearms such as sub-machine guns can be manufactured. Where local laws have created a sufficient market criminal organizations may readily act to meet the demand. One of the weapons I showed had been designed and constructed in Northern Ireland in what was then one of the most heavily policed areas of the United Kingdom. Where there is a will and a need a way will always be found.
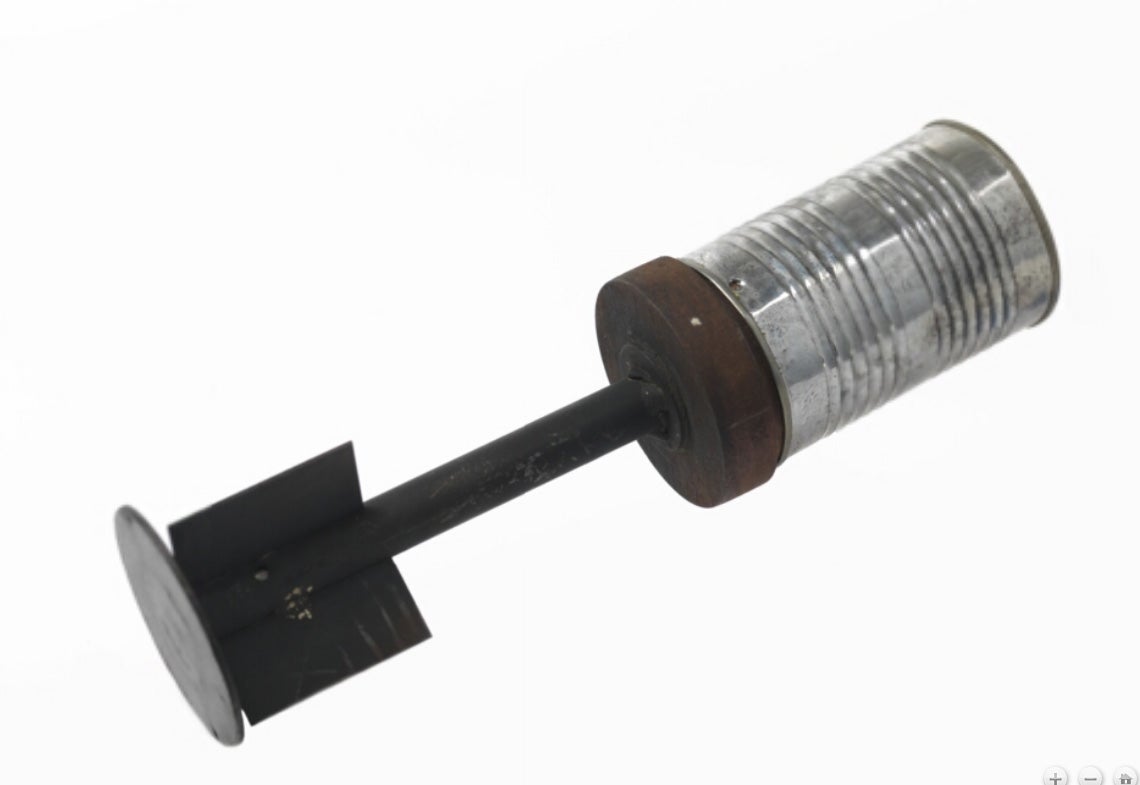
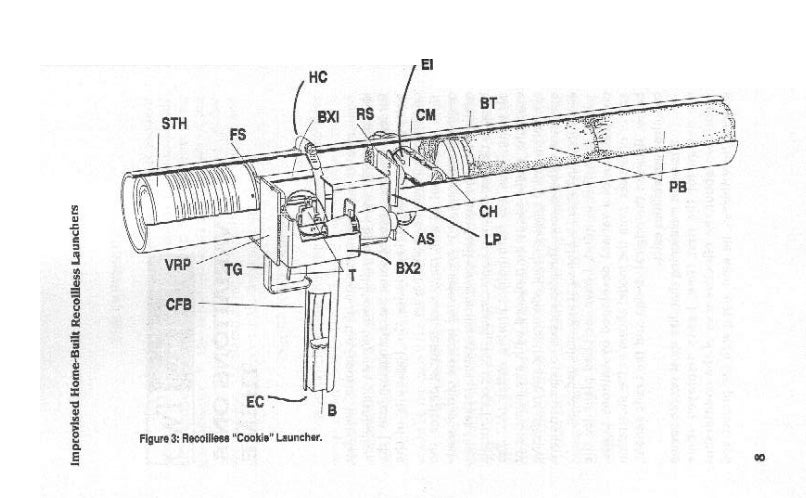
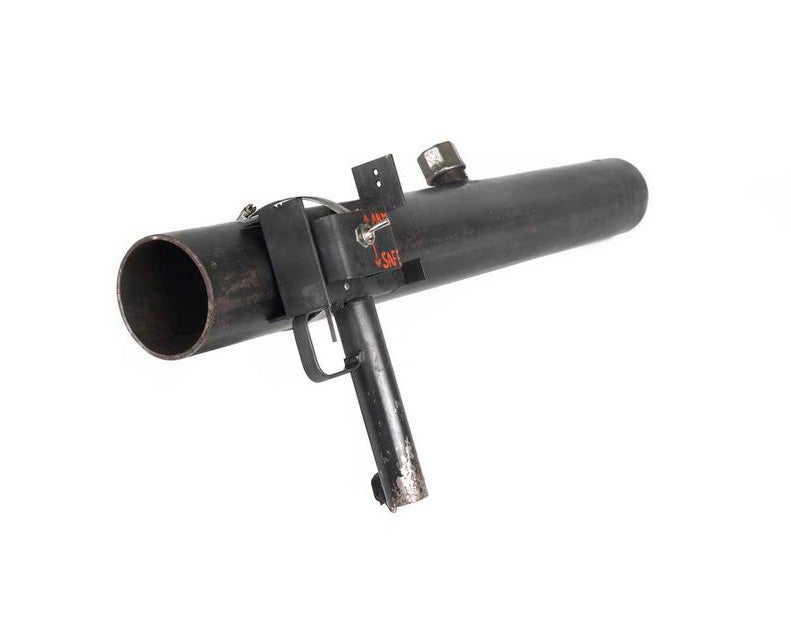
What I did not state in my earlier post was that the Irish SMG shown had been built by a Loyalist Irish faction. As far as I know the republican terrorists did not produce a significant number of homemade SMGs. The PIRA/IRA etc were well supplied with small arms from both Libyan and American sources. Where the IRA were very creative was in the field of heavier weapons. Yesterday I came across this interesting home-made weapon. It is a recoilless bomb thrower designed to attack unarmoured and lightly armoured vehicles. The projectile is made from a tin can containing a shaped mass of explosive. The weapon works on the Davis principle and uses two packets of biscuits as counter-shot. The local pigeons must look forward to a firing!
“...camouflage should never be treated as a "specialist" subject, but as part and parcel of every tactical move, for it deals with what the enemy sees of that movement.” Paragraph 14, page 8.
When it comes to personal camouflage the modern soldier is faced with several obstacles.
Many armies have adopted “designer label” patterns that do not live up to their inflated hype. Many modern patterns lack the element size and element contrast necessary to break up the distinctive human shape. At realistic viewing ranges the colours merge to create a brown-green man-shape. In addition to this problem there is often a failure to provide the serviceman with apparel in appropriate designs for the area where they will operate. The British army operated for decades in urban Northern Ireland wearing predominantly green and dark brown camouflage. Similarly, troops operating in desert environments have had to spend many years wearing distinctive black or green equipment and body armour. The latter problem could easily have been solved by use of a simple hessian smock or apron.
Modern combat gear tends to be overly tailored, in some cases being form hugging. This exacerbates the problem of the soldier being a distinctive man-shape. Close fitting clothing also may restrict freedom of movement, inhibits air circulation and limits the insulation that can be worn beneath it. “Camouflage uniform” is a military oxymoron. The soldier in the field should look as far from the crisp, parade ground ideal as possible.
Often the soldier is prohibited from camouflaging his weapon, or is reluctant to do so since materials must be removed for parades and insepections. This provides a distinctive shape for the enemy to notice despite any other camouflage measures the soldier may have taken. Knee pads are usually worn outside the trousers, providing another distinctive shape. Combat trousers should be sized so that knee pads can be worn underneath them, providing both better camouflage and air circulation. If you are worried about the knees of your trousers getting holed simply patch them with a double or triple thickness of material.
Any camouflage patterned cloth is only the foundation of personal camouflage. Three dimensional elements need to be incorporated. Some of these will be local foliage and some will be textile additions. A helmet cover printed with a camouflage pattern may still leave the helmet as a distinctive hemisphere. The cover does nothing to obscure the straight line of the brim or the regular shape of the helmet. Many helmet covers have very little provision for adding natural foliage. Other combat clothing and equipment seldom has provision for mounting foliage. Even in deserts where there is little vegetation the distinctive shapes of helmets, shoulders, pouches and packs needs to be disrupted.
Outdoorsmen, preppers and survivalists are not subject to the military regulations that often hinder a soldier but we often find ourselves influenced by what the military is doing, and sometimes this is not a good thing!
Recently I have been thinking about “un-uniformity”. I have also been considering how camouflage items will interact with other equipment present. Wearing a smock or poncho over your body armour solves the problem of distinctive shape and inappropriate colouration. There have been smocks that were intended to be worn over webbing gear too but it was found that soldiers generally prefer to have their ammunition outside. These pouches have a regular shape and they often create shadows in the chest area that are darker than the surroundings. The upper edges tend to catch the light, forming distinct straight edges. This is another area where 3-D camouflage measures should be applied.
The solution that I am going to propose is a little unconventional, but logical. Effectively, this is an improvement of the Viet cong cape seen in an earlier post.
Firstly, acquire a piece of material about two metres long and one and a half metres wide. Material is often sold in pieces of about 1.5m/ 60" width. This cloth should be of your preferred camouflage pattern. If you cannot acquire this then a couple of metres of hessian/ burlap is fine. You can paint a pattern onto this later.
Fold the cloth widthwise, then cut a curve between two opposite corners. You do not have to be particularly neat with this. When it comes to camouflage irregularity is good. You now have a half-oval shape, two metres long and one and a half across. Save the two remaining pieces, we will use them soon.
Take your piece of cloth and drape it over your head like a shawl. If you are likely to wear a helmet or boonie hat when using the cape, put this on first. The long straight edge is at the front, the curved bit hangs behind you. Once you have finished pretending to be Emperor Palpatine, mark where you think the cape fastening should be. See the video below on how this is done. You want the front edges of the cape to cross over a little.
There are a number of options as to how you may fasten the cape. Our ancestors used a variety of hooks, pins or knots. For the modern user a fastex buckle and short length of webbing strap will probably be most attractive. This allows for a degree of adjustment and the option of quick, one-handed release. Sew the ends of the straps to the inside of the cape. You may like to add a couple of lengths of cord inside. These can be hitched to your webbing and used instead of or in addition to the front strap. They can also be run down the front of your chest and tied behind your back.
Next, you have to sew a few centimetres inside the edges of the cape. We want the edges of the cape to fray. We will even be cutting the edges into tassels. But we do not want this to spread too far. Frayed and tasselled edges help break up the shape. They may even help the cape dry when wet.
The brim of the hood will need some work to make it less distinctive. Take one of your remnant pieces and use some of it to make a fringe that can be sewn into the brim. This should hang at about eyebrow height and will help put your eyeglasses in shadow to minimize reflections. The bottom level of the fringe may vary with headgear worn. Add buttons or poppers so you can shorten it if this is the case.
The next phase is to add the textile 3-D elements. The trick here is no to overdo things. We are not creating a heavy, full-blown ghillie suit. Natural materials will also be added to the cape and “overgarnishing” will attract attention instead of the intended purpose. It is possible to add textile elements in ways so that they also provide attachment points for foliage.
Sources for textile elements include:
Camouflage cloth. The remnant pieces you saved. Off-cuts. Cheap camouflage tee-shirts. Children's clothing. Old or damaged camouflage clothing. Non-official or captured clothing etc. A lot of camouflage is too dark once you place it around a convex human shape. Light coloured patterns such as pieces of desert cloth can help make your cape and its contents appear less solid. Green is less common in nature than is generally assumed. Capes intended for autumnal and semi-arid environments should go easy on darker greens.
Monochrome cloth in neutral and appropriate colours. Greens, browns, beiges, greys.
Hessian/ burlap. Sources include non-synthetic sandbags and gunny sacks.
Jute, hemp and raffia fibres.
Scrim
Pieces of camouflage net and/or artificial foliage from a net.
There is no need to seam any of these items. Fraying adds to the disruptive effect. Short pieces of material tend to stand up, longer pieces droop. Use more shorter pieces in area likely to be uppermost, such as the top of the hood, shoulders and the back. Remember you may be prone when using the cape, so include some “uprights” on the back.
Keep patches of netting and similar materials small. In heavy undergrowth these may get caught. In very heavy undergrowth the cape is easily removed and can be packed away until there is less cover.
The camouflage cape is not intended to keep you warm, or keep off the wind and rain. It is for camouflage. What you wear under it should handle these other duties.
When worn the cape covers the chest rig and any other equipment worn here. If a weapon is carried at “Rhodesian ready” or a similar position it will also camouflage the weapon until it is brought into action. The cape also covers and camouflages any rucksac or backpack being worn. This is one of the reasons the back part is cut longer than the front. When prone the cape will also cover most of the wearer’s body.
When the wearer is stationary the upper part of the cape can be pulled up over the wearer’s head like a shawl. obscuring the distinctive head and shoulders shape. When moving the “hood” can be thrown back, but its folds still help disrupt the shape of the shoulders. Unlike a conventional hood the folds of the cape can be arranged so that they will not catch on low-handing branches.
When not worn a cape can be rigged to create a hide or windbreak.
The cape can easily be replaced, making it practical to carry several capes with alternate patterns for different terrain or time of day. It is possible to create a cape with a different pattern on each side but I suspect it is not practical to incorporate textile 3-D elements on both sides, making one side secondary rather than alternate. The exception to this may be a snow cape with one side pure white and the other in a broken snow pattern. The doubled layer of cloth might prove welcome in such conditions, too.
Soldiers using capes in the snow. The agal-like headband keeps the cowl in place where moving. The headbands may also be a means of identification, necessary when both sides wear white. In warmer climates such headbands can also mount foliage.
The camouflage cape will work well with any other camouflaged items you may be wearing. It will probably work fairly well with non-camouflaged items, if they are of a reasonable hue and shade. It is not the whole story, of course. You will still need suitable headgear and facepaint/ mask/ headnet/ veil/ scarf/ neck gaiter. Your chest rig will be exposed once the cape is opened. Your chest rig should be of a light shade, overall, to counter body shading. Desert patterns such as British two-colour DPM, US “chocolate chip” and “coffee stain” and Tropentarn are good camouflage patterns for chest rigs. Add some tufts of textile to further break up the pouch shapes, remembering the top edges will catch the light. The front of the camouflage cape is dimensioned to not interfere with the movement of the legs so camouflaged trousers and/or gaiters are prudent.
In my last blog I quoted Tom Wintringham’s advice that the first lesson to learn was how to take cover. This piece of advice can be applied to survival as well as military personnel and has many aspects. It includes how to find shelter from the weather. It includes how to take cover from gunfire. It covers the difference between cover and concealment and it includes how to move between cover. Some of these aspects have already be addressed in this blog and future articles will cover others. Today I am going to share some reflections on concealment and camouflage.
In 1848 the British Army in India began to use khaki-coloured garments. “Khaki” is an Urdu word meaning “dusty” and the colour was a light beige, tan or dull pale yellow. The pioneer behind this was an officer called Hodson and it is notable that his early correspondence refers to the uniforms as mud or dirt-coloured, with the intent to make his troops “invisible in a land of dust”. Some garments were made by dying white items with tea. Garments that won’t show tea stains are only prudent for a British soldier, of course! Many garments were made from a cotton cloth called “khaki drill” and this name is used for the colour, the fabric and the uniform items issued in it. The British army at the time was a major influence on military fashions and many other nations adopted khaki, particularly for tropical wear.
In 1902 the British Army adopted a new service dress. Woollen cloth is generally not suitable for printing with camouflage patterns, so a single colour was required. (bear in mind the term “camouflage”did not come into use until during the First World War). The colour chosen for the 1902 dress was a hue intermediate between brown and green. Some paint manufactures call this hue “khaki drab” but it is commonly referred to as just “khaki”. Incidentally, the term “khaki” has become virtually useless for describing a colour. Imperial Japanese Army woollen uniforms are described as “khaki” but are closer to an ochre than khaki drab. Just to confuse things further the IJA used khaki drill for summer and tropical wear.
It seems to be deeply rooted into our psyche that nature and countryside is “green”. In actuality, a few days of military operations tend to render an area less verdant than before. Artillery, vehicles and boots soon create more mud than lawn. Green is also seasonal in temperate climates. Even in summer green is rare in some rural terrain such as rapeseed fields or ripened wheat. Hodson’s original idea of mud or dirt-coloured uniforms is more logical.
The selection of khaki drab was also based on the assumption that most fighting would be in rural areas. The Spanish Civil War indicated that urban areas would be important battlegrounds. Urban terrain negated many of an attackers’ advantages in aviation, artillery and armour.
Below is a suggestion of what battledress might have looked like if it had been designed for both rural and urban use.
That urban operations are not exceptional has still not fully penetrated the institutional military mindset. For several decades British troops in Northern Ireland wore dark green DPM. When the US Army tried to develop a Universal Camouflage Pattern at the start of the 21st century it chose the colours sand, grey and green. In practice UCP appeared to be several pale greys that blobbed out into a light man-shape that stood out against most terrain. Equipment such as webbing and pouches that will be used in a variety of environments also tends to be made with green predominating.
If we are choosing clothing for concealment it is most logical that we choose hues that will work well in both urban and rural terrain. Generally this means neutrals such as the duller, lighter shades of browns, beige, greys, yellows and pale blues. Lighter shades counter body-shading and in certain conditions will reflect light from surrounding terrain.
Should you choose monocolour or camouflage patterns? In some environments camouflage can attract unwelcome attention which can be counterproductive. Prudence suggest that you have at least one ensemble of mixed monocolours. In a rural situation natural materials can be added to this outfit to disrupt the shape and better fit in with your surroundings. If you are in an area where there is lots of green there are green things growing you can use. The WW2 Japanese were noted for their effective camouflage but did not widely issue any camouflage pattern items that I know of. Instead they used nets and natural materials over their green or khaki gear.
When buying items in camouflage patterns some prudence needs to be exercised. The primary task of camouflage clothing is shape disruption. The size and shade contrast between elements is far more important than the hues used. Many modern camouflage patterns neglect this fundamental, and often come up with all sorts of technical sounding snake-oil to defend this. The British MTP is a good example of a poor modern pattern. At more than a few metres the small colour elements merge and you see an obvious khaki drab man-shape, unlikely to blend with the background unless you get an exact match of hue and shade. Many older camouflage patterns tend to be too green and too dark for many environments, the latter made worse by body-shading. A good pattern needs contrast between elements and needs some of those elements quite light to counter shading and create the illusion of negative space.
You may be better buying some cloth or a garment of a suitable light neutral shade and adding your own pattern. See previous blog posts for ideas.
Below is a camouflage pattern and palette that I have been toying with. It is intended for both urban and rural use. In a verdant environment green can be added in the form of natural materials.
Any camouflage pattern on a cloth is only the foundation for your camouflage. You must add 3D elements too. Some of this is local and natural materials. If you are in a forest you might add bracken to your headgear, pack and shoulders. If you move into a wheatfield you dump the bracken and replace them with bunches of wheatstalks. 3D is also provided by textiles. Your cape or smock should include various scraps of fabric sewn to it that disrupt the shape and smoothness of the garment. These ideas have been covered in previous blogs.
The above advice comes with a caveat. Three environments occur to me where there may be alternate choices to the yellows, greys and browns suggested above.
The first is in snow, where predominantly white camouflage may be needed.
The second is in urban environments where red brick is the main building material. Many urban environments use a variety of materials so browns and greys serve well in most situations and do not look out of place near the occasional red surface.
The third is in rainforests, be they temperate or tropical. Brown-based items can work here if they are combined with local materials. This is, however, an environment where green-based camouflage patterns or pale green monocolours may be a more practical choice.
Recently I was talking about carabiners. Specifically, I said: “Carabiner: A carabiner makes a very practical keyring and has a number of uses. Several of the items listed above can be conveniently carried on your keyring. If your gear has loops or rings it can be temporarily attached to the carabiner when you need your hands free. I sometimes use mine to carry shopping bags.”
I always try to pay attention to good advice, particularly when I am the one giving it! I decided to make sure that all my rucksacks have a carabiner or snap-link positioned where it can serve as an extra pair of hands when needed. Since I am right-handed then the left shoulder strap seems a logical position.
Several of my packs have loops or D-rings in these locations, so adding a snap-link to these was a simple affair. Other packs needed minor modification. For these I took a short length of badge lanyard and sewed it into a loop.
Here are some photos:
Two daysacs I have. For these I opened up the sticking and then resewed with the loop in place.
This is a large pack I have used for much of my travelling. It is an excellent design that has six large external pockets. It converts into a suitcase so the straps are protected while the pack goes through baggage handling. For this pack I made a closed loop and sewed it into position.
Lastly, we have my Northern Ireland patrol pack. Fitting the snap-link to this one did not involve any sewing. I had already sewn a length of paracord to each strap for attaching the camouflage, so the snap-link attached to this. The detachable side pouches attached to this pack have their own harness, so this got a snap-link too.
Just for good measure, I also added a snap-link to my knife belt.
Following my recent look at covert and James Bond firearms I thought a look at armament for more “overt” special operations might be instructive. In addition to special forces this includes the reconnaissance sections of more conventional units and hostage rescue units such as SWAT.
If our TV screens are to be believed special forces always favour unsuppressed MP5s, which will seldom be fired in burst of less than ten rounds. Some MP5s used as props have probably logged more screen time than Richard Jaeckel!
There is no single “best” weapons for such operations so I will limit this post to the subject of suppressed weapons. There are a number of reasons why suppressed weapons might be used. The obvious one is to avoid unwelcome attention. As well as the military advantages of this property it is also welcome for applications such as pest control. In confined spaces gunfire can be deafening and disorientating, which is a reason to favour suppressed weapons for overt CQB operations such as SWAT assaults. Suppressors also protect the hearing of shooters (and that of their dogs) so can be beneficial in situations where more conventional hearing protection is impractical. I recently read a statement that some suppressors make shooting in volatile atmospheres such as drug labs less hazardous.
Below is a British weapon known as a “De Lisle Carbine”. These were built from a number of existing constructions. The action is from an SMLE, the magazine from a Colt 1911, the barrel from a Thompson SMG and the sights from a Lancaster machine carbine. The stock of the folding variant looks like that of a Patchett/ Sterling, a weapon being developed in the same factory at the same time.
Allegedly the loudest noise when firing the De Lisle was the striker hitting the cap! The bolt handle included a rubber pad on the underside to muffle the metallic click of operation. Operating the bolt was the loudest part of operating the De Lisle but being a manual action the user could at least choose to do this when they thought it most expedient. Unlike many of its contemporaries the De Lisle uses the .45 ACP round and is effective to three or four hundred yards. The De Lisle was used in the latter half of World War Two and the Malaya Emergency. It may have been used in Korea, Northern Ireland and later conflicts.
The De Lisle was an excellent weapon for dispatching sentries at relatively long ranges. It was not so useful if you needed to quickly neutralize a guardroom full of enemies. For such missions there was the silenced models of the Owen, Sten mk II and mk VI and later the silenced Sterling L34. These selective fire weapons all use the 9mm Luger round which is supersonic in its standard loading. There are two approaches to this problem, neither really ideal. The first is to port the gun barrel and bleed off propellant from behind the round, reducing the velocity of standard ammunition. The requires a bulkier and more complex suppressor to deal with the bled off gases. The other approach is to issue special subsonic loadings of ammunition, such as the 139gr Nahpatrone ‘08S or the MEN 155gr im 9x19mm. Small quantities of specialist items have a tendency to get lost in the supply system or not reach where they are needed.
For suppressed applications the .45 ACP has a number of advantages. It is subsonic in its standard loadings and is widely available. The bullet is also heavier than that of most subsonic alternatives. If you fire two bullets of similar design at the same velocity it is the heavier that will usually travel furthest and hit harder.
The formative years of the SMG were centred on Germany so designs not in 9mm are rare. Suppressed .45 weapons are even rarer, but not unknown.
One design that has seen some use is the suppressed M3 and M3A1 “Grease Gun”. Below is the wartime version. The OSS Weapons and Equipment Catalogue (p.41) comments that the bolt movement is still noisy but at least the operator is no longer deafened by the clatter of the piece. The weight of the suppressor also counters muzzle climb.
In US hands the suppressed M3/ M3A1 served at least until Vietnam. In the hands of other nations these weapons served even longer. Below are a number of M3s used by Philippine troops. Some appear to have new designs of suppressor and modernized sighting systems. Wisely the operators have camouflaged their weapons.
There are two objectionable features of the M3 as a commando weapon. One is that it fires from an open bolt. The second is that it can only be fired fully automatic. Neither of these features lends itself to medium range precision fire such as eliminating sentries or cameras.
Many years back I proposed that a .45 version of the Sterling would be a very useful weapon. The configuration of the Sterling allows a prone shooter in an OP to stay really low and hidden. Police variants of the Sterling are designed to be fired from a closed bolt. Potentially the bolt could be locked in the forward position, functioning like a slide lock on a suppressed pistol. Noted as a very reliable design Sterlings sold worldwide with 400,000 being produced. Its production and distribution might actually exceed that of the MP5, but Hollywood seldom shows them! Sadly the production lines for the Sterling has long since been scrapped.
Another user of the M3 was the South Korean special forces. When replacements became necessary someone had the smart idea of adapting the Daewoo assault rifle into a suppressed SMG. I think they would have been wiser to have made it .45 rather than 9mm, but they were on the right lines. Several designs of assault rifle such as the AUG and Tavor can be modified into 9mm weapons. There are also other SMG designs that use components of assault rifles, such as the Chilean SAF and the Colt 9mm.
Basing a suppressed SMG on an assault rifle has a number of advantages. Troops need little additional training and supply and maintenance are simplified. Assault rifles generally use closed bolt operation. This can be retained even if the design switches from gas to blowback operation. Many assault rifle designs have non-reciprocating bolt handles which may decrease the mechanical noise of firing. It might be prudent to take a leaf from the PB’s book and construct the suppressor in two parts: a rear section to deal with bled gas and a detachable forward section to handle muzzle blast. The detachable section will make transporting the weapon more convenient and allow the firer to make noise when attention is desirable for signalling or distraction.
The envisioned weapon would have both close range assault application and a medium precision role so might more accurately be termed a carbine. There are some newer subsonic rounds such as the .30 Whisper, .30 Blackout and 9x39mm but I think the .45 still has much to recommend it. Possibly magazines could be compatible with handguns. Some years ago I wrote an article on a “magsub” using the .45 win mag for an unconventional warfare weapon. This is still an attractive idea but would mainly be useful if the round can use heavier subsonic bullets than the .45 ACP. Compatibility with handguns would also need to be investigated.
Below are rather nice images that give an idea what a suppressed .45 AR-15-based weapon might look like. Magazine would be different, of course.
Below is a Chinese soldier armed with the Type 64 suppressed SMG. The standard Chinese SMG and pistol load is the 7.62x25mm Tokarev, an 85gr bullet noted for its high (1,650 fps+) velocity. The Type 64 uses a subsonic load using a bullet of between 187-202gr. One wonders if these are rifle bullets and how bullets of that mass fit in the cartridge case. Allegedly the Type 64 can use standard pistol ammunition but I wonder if any modifications are necessary or loss of performance results.